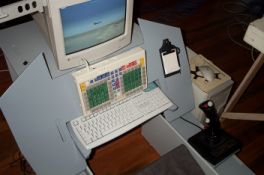
Cockpit Overview
The Akers Barnes Cockpit (ABC) is a versatile, easy to build cockpit that greatly enhances the enjoyment of any computer based simulation. Whilst primarily used for flight simulators it is easily adapted for other simulators such as driving/combat simulators.
The Akers Barnes Cockpit is:
- Easy to Build: If you can draw a line and cut wood with a saw you are good to go!
- Easy to transport: Breaks down in minutes and fits in the boot of a small car (even MG's)!
- Easy to Adapt: People all over the world have built and customised the ABC design
- Plans are Free: You''l have to build it but you can download the plans for free!
History
In early 1999 a number of people from simulation clubs throughout Australia and New Zealand got together and gave a presentation of our hobby at the Avalon Air Show in Victoria. We were fortunate enough to have a number of cockpits along. Four of the excellent Simpit cockpits were there, along with one of the EZ-Cockpits and a new design by Allen Pawley. We were so impressed with this design that Michael Barnes and myself (Peter Akers) sat down and designed and built our own cockpit, loosely based on Allen's concept.
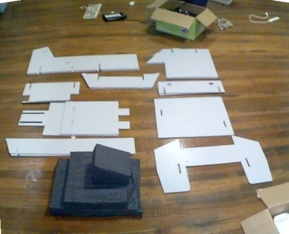
The Design Requirements
- We could build it with available tools. This largely restricted us to wood. I had a reasonable collection of tools for wood working and some experience with them.
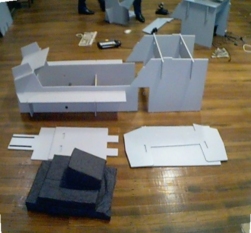
- We intended to use the cockpits at our regular LAN meets, so they had to pack down and fit into our cars. In particular it had to fit into Michael's Honda Prelude. (If you know the size of these cars, that isn't very big, especially if you also realise that you also have to pack in the computer and other necessary bits..)
- They were not to be any screws, bolts etc.
- All the parts had to lie flat. It was important that they stack easily, without bits sticking out to get caught, scratch things etc.
How it all came together
I started by doing a few designs in a fairly basic CAD package that I had picked up for free on a magazine cover. I then exported them out to Asymetrix Web3D so I could texture them and and produce raytraced images for people in the club to comment on.
Once we had a good basic concept, Michael and I spent one Saturday redesigning it. I was working on a design with single long side pieces and a sliding computer desk on the top (to allow you to get in then slide the monitor and keyboard toward you). We gave up on this idea for a number of reasons including the fact that we would need to hinge the side pieces, buy a track system etc., but the single deciding factor was that we realised that the desk section had to be about 10cm wider than the seat section. We only wanted the seat as wide as our bodies so that we could bring our elbows beside the seat easily and comfortably. But, the desk section needs to be wide enough to fit a set of Thrustmaster RCS rudder peddles. This really left us with only one sensible choice, to split it in two. Once we settled on the two part design, desk and chair, we realised there was another advantage in that you could move the pieces apart to cater for different sized people.
One decision we made that may make the design look less attractive and a little less flexible than Alen's original, was the choice not to use a steel bar at the back of the chair. As mentioned before we wanted to be able to easily and comfortably bring our hands down the side of the chairs (this is important when you pull back fully on the stick). So we decided to make the back support stand well away from the raised sections of the side pieces. This means that if you want to adjust the angle of the seat you need to cut a bit off (or add a bit to) the back support piece, unlike Alen's where you simply put the back piece into a different hole, but the side piece is always in the way of your elbows. We still consider this to be a worthwhile compromise.
When we were happy with the design we cut out a full size pieces out of cardboard. We had lots of fun sitting in this wobbly mockup deciding on seating positions. This was really worth the effort.
Now we could finally start cutting, it was mid-afternoon by this point so there was no hope of doing two, so we marked and cut one. It was 7:00 pm by the time we finished, and the last few cuts we done with hand tools to avoid complaints from the neighbours. To our satisfaction it went together without major problems ( a couple of tight fitting pieces.)
The following day was the monthly LAN meet of the 62nd Fighting Falcons and Michael showed off our creation to general admiration. Next weekend Michael and Mathew came over and we built the second and third cockpits using the original as a template.
Legalese
This design is Copyright © Peter Akers and Michael Barnes, 2004. All rights reserved. Permission to utilise this design to construct a cockpit, or to adapt this design to another application, must be obtained in writing or e-mail from us at Flying Furniture. We apologise for this requirement, but we wish to retain the rights to this design should we ever intend to go into commercial production. In order to retain those rights, we can only allow the design to be utilised under license. However, we are happy to grant license to members of the on-line flight simulation community who would like to use our design to construct a cockpit for their personal use, provided you contact us for permission. We do not charge for use of the design, though donations are gratefully accepted. If you obtained this document from a friend, and would like to use the design, please contact us at the e-mail addresses below. For permission to utilise the design for commercial production, please contact us for licensing arrangements. Contact Information Michael Barnes loophole@internode.on.net
Disclaimer
Peter Akers and Michael Barnes take no responsibility for injury to person or property that arises during the construction or use of the cockpit described here. You must use your own judgement as to the quality of materials and workmanship required, and your own competence to undertake the construction.
Download
Note: The plans are in Microsoft Word 6 format in a zip file. Both metric and imperial measurement versions are included. If you have problems with this format, contact one of us and we will see what we can do for you.
I agree to the copyright restrictions above and acknowledge the disclamier, and would like to download the plans.